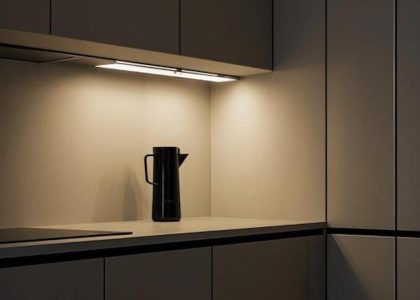

Thinking about how to light up those dim areas under your kitchen cabinets? Hand-wave sensor lighting is a fantastic, practical solution. It gives you instant, touch-free illumination exactly where you need it, making tasks like meal prep easier and safer. No fumbling for switches with messy hands – just a simple wave.
Forget about traditional switches or pull cords. Hand-wave sensor lighting is all about convenience and hygiene. It integrates seamlessly into your kitchen, providing light exactly when and where you need it, without adding to your mental load.
Keeping Things Clean
One of the biggest perks is hygiene. In a kitchen, surfaces can get messy in a blink. Imagine you’re kneading dough or handling raw meat. The last thing you want to do is touch a light switch, leaving a trail of whatever’s on your hands. With a hand-wave sensor, you simply wave your hand, and the light comes on. No contact, no mess, no cross-contamination worries. It’s a small detail that makes a big difference in a busy kitchen environment.
Effortless Operation
Simplicity is key, especially when you’re multitasking. You don’t need to hunt for a switch or remember a specific button. A quick, intuitive hand wave is all it takes. This means faster access to light when you’re looking for ingredients, reading a recipe, or just cleaning up. It truly makes your cooking space more user-friendly.
Enhancing Safety
Well-lit countertops are safer countertops. Chopping, slicing, and dicing all require good visibility to prevent accidents. Dark spots or shadows can obscure your view, leading to potential bumps or cuts. Hand-wave activated lights ensure you have ample light exactly where your knives and hands are working, reducing the risk of kitchen mishaps. It’s an easy way to boost safety without thinking twice.
How Hand-Wave Sensors Work
It’s actually pretty straightforward. These sensors use infrared technology to detect motion. When your hand passes within their detection range, a small, invisible beam is interrupted, triggering the light to turn on or off.
Infrared Detection Demystified
Think of it like an invisible tripwire. A small infrared emitter in the sensor sends out a beam of light, and a receiver looks for that beam. When your hand enters the detection zone, it breaks this beam, and the sensor registers the change. This signal is then sent to the light fixture, telling it to switch on or off. It’s a reliable and quick method.
Optimal Sensor Placement
Where you put the sensor matters for best results. Most hand-wave sensors are designed to be quite small and unobtrusive. They are often integrated directly into the light strip or cable, or as a small, separate puck. For under-cabinet lighting, placing the sensor slightly recessed or at the front edge of the cabinet ensures it catches your hand movement easily. You want it accessible but not accidentally triggered.
Powering Your Lights
These lights are typically low-voltage LED systems. This means they usually come with a power adapter that plugs into a standard wall outlet. The adapter converts your household voltage to the lower voltage needed for the LEDs. Installation often involves connecting the LED strips to the sensor, and then the sensor to the power adapter. Sometimes, the sensor is built right into the light strip, simplifying the wiring even further.
Types of Hand-Wave Sensor Lighting
You’ve got a few options depending on your needs and DIY comfort level. The most common setups involve LED strips, but there are also bars and discs.
LED Light Strips
These are by far the most popular choice for under-cabinet lighting. They’re flexible, come in various lengths, and can be cut to fit your specific cabinet dimensions.
Cut-to-Fit Customization
Many LED light strips are designed to be cut to size at designated points, usually every few inches. This allows you to get a perfect fit for any cabinet length, whether it’s a short spice cabinet or a long stretch of countertop. Just be sure to cut only where indicated to avoid damaging the circuit.
Adhesive Backing for Easy Install
Most LED strips come with a strong adhesive backing, often 3M tape. This makes installation a breeze – just peel and stick. This is great for renters or anyone who wants a less permanent solution, as it usually doesn’t require drilling or elaborate mounting hardware.
Diffusers for Even Light
While some strips are bare, many benefit from an aluminum channel with a diffuser cover. This cover softens the individual LED dots, creating a more uniform and diffused light output. It looks more professional and reduces glare, making the light much more pleasant to work under.
LED Light Bars and Puck Lights
If you prefer something more robust or need focused spots, bars and pucks are alternatives.
Sturdier Build
LED light bars are typically housed in an aluminum or plastic casing, making them more durable and often providing a more linear, even light throw. They’re less flexible than strips but can offer a cleaner, more finished look in some installations.
Focused Illumination with Puck Lights
Puck lights, as their name suggests, are small, circular lights. They’re great for spotlighting specific areas, like inside a cabinet or above a particular task zone. They’re often used in conjunction with strips to add extra brightness in key spots or to highlight decorative elements.
Installation: What to Expect
Don’t let installation scare you off. For most hand-wave sensor setups, it’s a pretty manageable DIY project. No need to hire an electrician for most low-voltage systems.
A Few Basic Tools
You won’t need a whole workshop. Grab a tape measure, a pencil for marking, some rubbing alcohol for cleaning surfaces, maybe some wire clips if the kit doesn’t include enough, and possibly a small screwdriver if you’re mounting a separate sensor. That’s usually about it.
Step-by-Step Overview
- Plan Your Layout: Decide where you want the light strips and the sensor. Test the sensor’s range to ensure it’s in a convenient spot for waving.
- Clean the Surface: Wipe down the underside of your cabinets with rubbing alcohol. This is crucial for the adhesive backing to stick properly.
- Mount the Lights: Peel the adhesive backing and firmly press the LED strips into place. If using channels, mount the channels first, then insert the strips.
- Connect the Wiring: Plug the LED strips into the sensor, and the sensor into the power adapter. Ensure all connections are secure.
- Secure Wires: Use cable clips or zip ties to tuck away any loose wires. You want a clean, tidy look.
- Plug It In and Test: Plug the power adapter into a wall outlet and test your new hand-wave lighting!
Hiding Those Wires
The trickiest part for some can be managing the wires so they’re not dangling or visible. Adhesive cable clips are your best friend here. Run the wires along the underside of the cabinets, securing them every few inches. If you have cabinets with a lip or fascia near the ceiling, you might be able to tuck wires up there too. The goal is a clean, finished look, not a spaghetti mess.
Features to Look For
Not all hand-wave sensor lights are created equal. Keep an eye out for these features to get the best bang for your buck and maximum convenience.
Adjustable Brightness (Dimming)
Being able to dim your lights is a huge plus. Sometimes you need full brightness for chopping vegetables, but other times you might want a softer glow for a late-night snack run or ambient lighting. Some hand-wave sensors allow you to briefly hold your hand under the sensor to cycle through brightness levels, or they might have an additional touch point for dimming.
Color Temperature Options
“White” light isn’t just one thing. It ranges from warm, yellowish tones (around 2700K-3000K) to cool, bluish tones (5000K-6000K).
Warm White for Coziness
If your kitchen has a lot of wood or warmer tones, or if you prefer a cozier atmosphere, warm white light is usually the way to go. It feels more inviting and less sterile.
Cool White for Task Lighting
Cool white light, closer to daylight, tends to be more energizing and is often preferred for task-oriented areas where you need maximum clarity. It can make colors appear truer, which is handy for cooking.
Tunable White for Versatility
Some advanced kits offer “tunable white” LEDs, which means you can switch between warm, cool, and sometimes even neutral white (around 4000K). This gives you the ultimate flexibility to match your mood or task.
Sensor Range and Sensitivity
You want a sensor that’s responsive but not too responsive.
Practical Detection Distance
A sensor that detects a wave from 2-4 inches away is ideal. Too short, and you’re practically touching it; too long, and it might get triggered by accidental movement past the counter.
Avoiding False Triggers
Good quality sensors are designed to minimize false triggers. They’re usually looking for a clear, relatively swift hand motion rather than just ambient movement. If your sensor is constantly turning on and off for no reason, it might be too sensitive or poorly placed.
Multiple Connection Options
Think about how you’ll power and connect everything.
Expandability
If you have a large kitchen or multiple cabinet sections, consider systems that allow you to connect multiple light strips or bars to a single power supply and sensor. This simplifies wiring and management.
USB Power Flexibility
Some smaller kits or individual lights might offer USB power. While less common for full under-cabinet runs, it can be handy for smaller, isolated sections or for those who want to power directly from a USB outlet or power bank.
Common Questions and Troubleshooting
Even with simple tech, questions pop up. Here are a few common ones and some practical tips.
What if the Sensor Doesn’t Respond?
First, check your power connection. Is the adapter plugged in? Is the outlet working? Then, make sure all the wire connections are snug. Sometimes a loose plug is all it takes. Next, check the sensor’s range – try varying your hand placement and speed. If it’s still not working, it might be a faulty sensor or LED strip, in which case contacting the manufacturer is your next step.
Lights Flicker or Dim Unexpectedly?
Flickering can often indicate an insufficient power supply or a loose connection. Double-check all wiring, especially where the strip connects to the sensor and the sensor to the power adapter. If it’s an expandable system, you might be overloading the power adapter if you’ve added too many strips. Make sure your power supply is rated to handle the total wattage of all connected lights.
Accidental Triggers?
If your lights are turning on when you don’t want them to, the sensor might be too sensitive or poorly placed. Try moving the sensor slightly, or see if there’s an adjustment for sensitivity. Sometimes, simply recessing it a little further under the cabinet or slightly changing its angle can help. Keep in mind that a hand-wave sensor is designed to react to motion, so it might occasionally get tripped by something unexpected.
Can I Use It with My Existing Lighting?
Generally, no. These hand-wave sensor kits are self-contained systems. The sensor is designed to work with the specific LED strips or bars included in the kit or those compatible with its voltage and connection type. You can’t usually splice it into existing hardwired overhead lighting, for example, without a significant electrical rework, which is best left to a professional.
Durability and Lifespan
Most quality LED hand-wave sensor light kits use durable LEDs designed for tens of thousands of hours of use. The lifespan of the sensor itself is also generally quite good. Look for products with decent warranties as a sign of manufacturer confidence in their longevity. Keeping the sensor clean (a quick wipe with a dry cloth) can also help maintain its responsiveness.
Final Thoughts
Hand-wave sensor kitchen cabinet lighting is more than just a novelty; it’s a genuinely practical upgrade. It makes your kitchen cleaner, safer, and more convenient to use, especially during those busy cooking moments. With easy installation and increasingly affordable options, it’s a simple way to bring a touch of modern efficiency to your most-used room.